About Windows Integrated Security
•About Authentication Methods in Ivanti Neurons for ITSM
•Configuring Ivanti Neurons for ITSM and Windows Integrated Security
•Configuring Ivanti Neurons for ITSM and Windows Integrated Security for External Authentication
•Validating Incoming Authentication Requests
•Configuring Windows Integrated Security for Auto Provisioning
•Configuring Windows Integrated Security Provider to Sign its Response with a Certificate
•Configuring the Server to use Windows Integrated Security
•Setting the Default Authentication Provider
•Configuring Windows Integrated Security to Work in Debug Mode
•About Disabling Windows Integrated Security
•About the Encrypted Config Sections in the Web.config File
•Configuring Your Browser to Use Windows Integrated Security
About Authentication Methods in Ivanti Neurons for ITSM
There are two ways to authenticate users in Neurons for ITSM:
•Windows Integrated Security: Uses Windows credentials. This option is only available for the on-premise version of Neurons for ITSM. The user's computer must be a member of the Windows domain.
•Direct AD Authentication: Uses the identity provider of the customer. This option is available for the on-premise and Cloud versions of Neurons for ITSM. Users must log in each time, although they can save their credentials within their browser.
Users can access authentication either by going directly to the identity provider (such as Active Directory, SAML, or OpenID), or by logging into Neurons for ITSM (which then redirects the user to the identity provider).
•The identity provider authenticates the user but does not share credentials.
•The identity provider session is separate from the Neurons for ITSM session, and must be configured separately.
•The identity provider is configured separately and according to the specific identify provider process.
The following illustrates how Active Directory authentication works:
Active Directory Authentication

Configuring Ivanti Neurons for ITSM and Windows Integrated Security
This topic describes how to configure Neurons for ITSM Active Directory authentication using Windows Integrated Security (WIS). This feature allows users to access Neurons for ITSM without entering their user name and password. This procedure is only valid for the on-premise version of Neurons for ITSM.
1.Log in to the Neurons for ITSM configuration database (ConfigDB) and open the Tenants workspace. The application displays a list of the available tenants. See the Configuration Database Guide for Ivanti Neurons for ITSM for information about using the ConfigDB.
2.Open the Tenant workspace for the tenant to use.
3.In the Login Url field, enter the URL where users go to log in.
4.Click Save.
5.In a separate browser window or tab, log into Neurons for ITSM .
6.Click Configure Application to go to the Configuration Console.
7.Click Configure > Security Controls > Authentication Providers to open the Authentication Providers workspace.
8.From the New Record Menu drop-down list, select New Windows Integrated.
9.Enter information into the fields.
New Windows Integrated Page
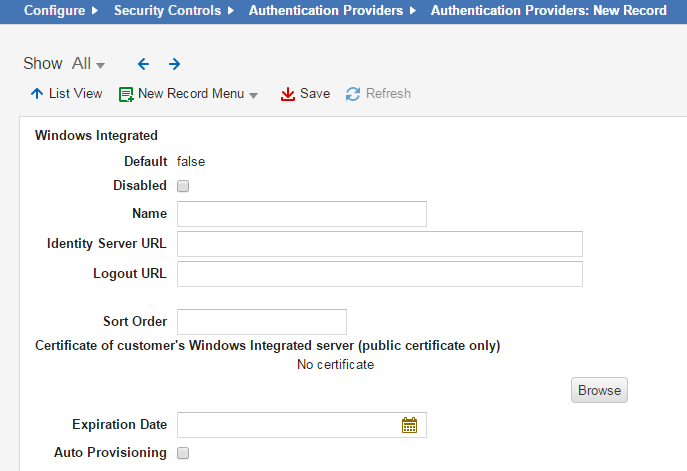
| Field | Description |
|---|---|
| Default |
Specifies if this authentication provider is called.
Automatically set by the application. You change this in the list. To make this authentication provider the default, you must first change the Default setting for all other authentication providers to false and then change the Default setting for this authentication provider to true. |
| Disabled | Specifies if this authentication provider is disabled. |
| Name | The provider name, such as WIS. |
| Identity Server URL | The path to your identity server, such as /HEAT/WIS. |
| Logout URL |
The URL to which users are directed when logging out of the authentication provider. |
| Sort Order |
Specifies the sort order of this provider in relation to other providers assigned to a user. A value of 1 means that this provider is used first for authentication when logging in. If a login failure occurs (such as a server failure or incorrect password), the application uses the next provider in the sort order. The last successfully authenticated login is highlighted in the Enable External Auth area of the employee record. Use this field only if multiple authentication providers are configured. |
| Certificate of customer's Windows Integrated server (public certificates only) | Only applies to public certificates. Click Browse to navigate to the certificate. |
| Expiration Date |
Specifies the date that the certificate expires. This field merely stores the date so that you can see when the current one expires and get another certificate before or when it expires. |
| Auto Provisioning |
Adds new users via authentication. You have the option to auto provision the role, status, and team for the new user. If selected, the application creates an employee record if a user logs in using authentication and does not already have an employee record. |
| Auto Provision Role |
Only displays if you check Auto Provisioning.
The role associated with the new user. |
| Auto Provision Status |
Only displays if you check Auto Provisioning.
|
| Auto Provision Team |
Only displays if you check Auto Provisioning.
The team associated with the new user. |
| Auto Provision User Business Object |
Only displays if you check Auto Provisioning.
The type of user record to create. Can be either employee or external contact. |
10.Set the new authentication provider as the default by highlighting it and clicking Set Default.
11.Log into the Service Desk Console.
12.Open the Employee workspace, then open an employee record.
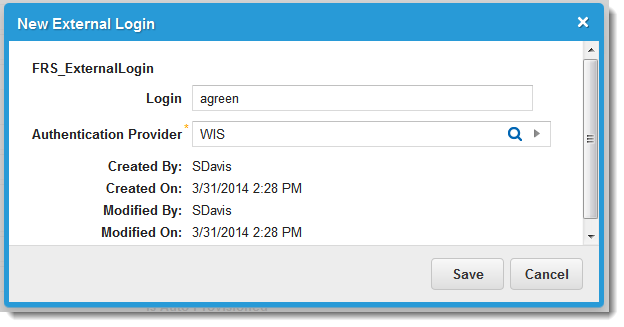
13.Modify an existing employee by enabling External Auth and specifying Login for External Auth as the newly created Windows Integrated authentication provider.
Check Enable External Auth and Click Add New ...

Enter the Name of your Windows Integrated Authentication Provider
14. Click Save.
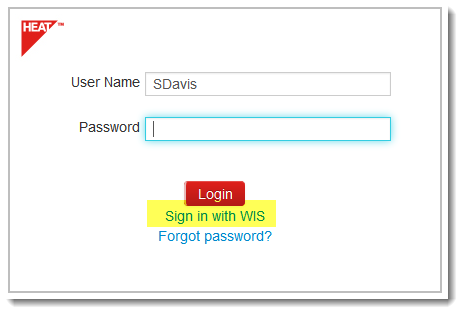
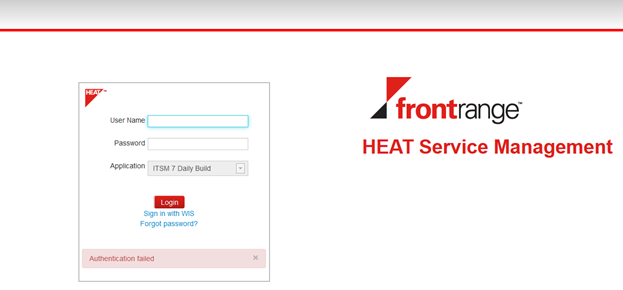
15.Log out. The Login page appears with Sign in with WIS.
Sign In with Windows Integrated Security
16.Next to Login for External Auth, click Add New. The application displays the New External Login dialog box. If the dialog box does not appear, then Windows authentication is disabled for Windows Integrated Security.
17.Click Sign in with WIS. The application displays the Windows sign-in dialog box.
18.Enter your user name and password, then click OK. The application authenticates the user using Windows Integrated Security.
If auto provisioning is enabled in the new authentication provider, you can skip steps 12-14. Neurons for ITSM creates a new employee with external authentication enabled and the login for external authentication is specified as the Windows integrated authentication provider.
Configuring Ivanti Neurons for ITSM and Windows Integrated Security for External Authentication
The lifecycle for external authentication using a Windows Integrated Security provider is as follows:
1.Windows Integrated Security receives an authentication SAML request from Neurons for ITSM.
2.Windows Integrated Security validates the request and checks the certificates.
3.Windows Integrated Security creates the SAML response.
4.Windows Integrated Security signs the SAML response with the certificate specified in the web.config file.
5.Windows Integrated Security enables auto provisioning in the SAML response using LDAP configuration from the web.config file.
6.Windows Integrated Security posts the SAML response back to Neurons for ITSM.
You can configure Windows Integrated Security in the web.config file. You can specify whether an external authentication request from Neurons for ITSM should be validated and its certificate checked. To skip the authentication request validation, do not specify the heatCertificatePath application setting in the web.config file.
Validating Incoming Authentication Requests
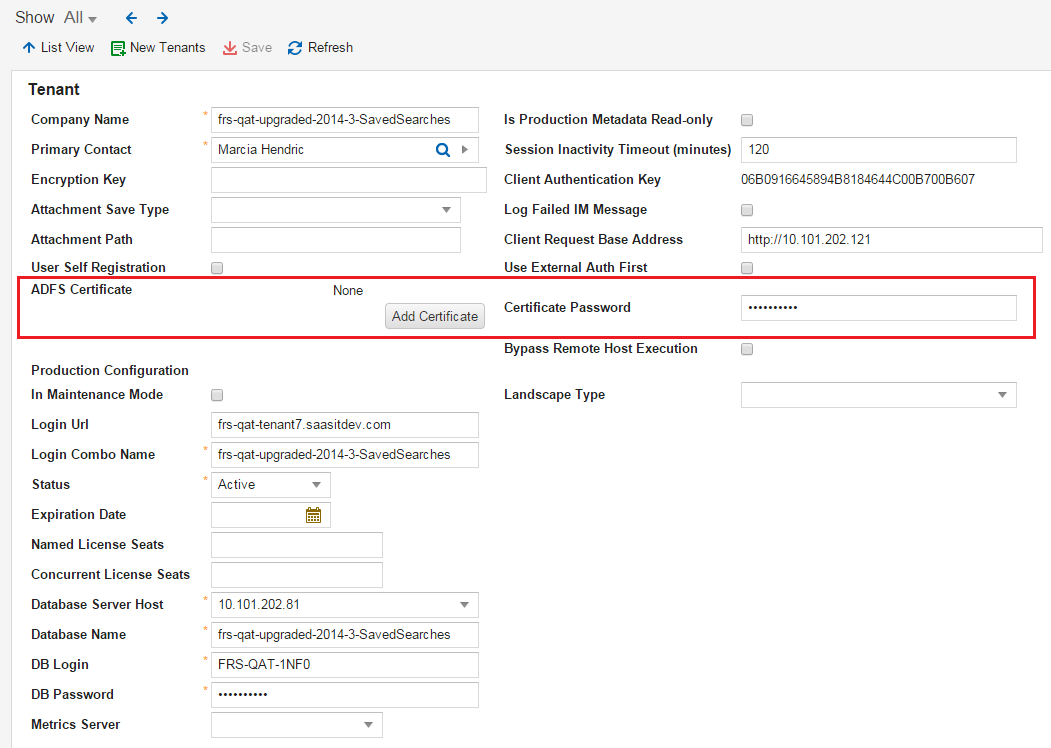
1.The Neurons for ITSM tenant may be marked with an ADFS private certificate. To check or specify it, do the following:
| a. | Log in to the ConfigDB and open the Tenants workspace. The application displays a list of available tenants. See the Configuration Database Guide for Ivanti Neurons for ITSM for information about using the ConfigDB. |
| b. | Open the Tenant workspace for that tenant. |
| c. | Click Add Certificate to add the ADFS private certificate for this tenant. |
| d. | Browse to the certificate, highlight it, and click Open. |
| e. | Enter the password for the certificate. |
| f. | Specify the ADFS private certificate and its password for each corresponding tenant. |
Set the ADFS Certificate for Each Tenant
2.Open the web.config file with a text editor (such as NotePad), and set the heatCertificatePath setting to a path relative to the public certificate. This is used on the Windows Integrated Security side for validating Neurons for ITSM requests.
<configuration>
...
<appSettings>
<add key="heatCertificatePath" value="Certificate\HeatCertificate.cer" />
</appSettings>
...
</configuration>
If the heatCertificatePath setting is specified incorrectly or if there is no such directory or file, the application throws an unhandled exception during the validation process. For example:
<add key="heatCertificatePath" value="Certificate\HeatCertificate.cer INCORRECT NAME" />
produces:
Server Error Example
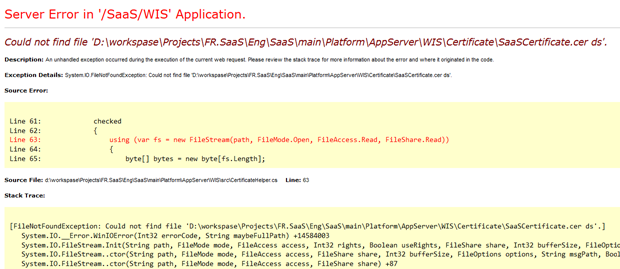
If you do not see an error message, the validation of the external authentication succeeded.
Configuring Windows Integrated Security for Auto Provisioning
The Windows Integrated Security web.config file may contain the LDAP server and active directory LDAP queries used for retrieving data needed for auto provisioning:
•First name
•Last Name
•LoginId
After Windows Integrated Security performs the LDAP search with parameters given in the web.config file:
<configuration>
<configSections>
<section name="ldapConfiguration" type="System.Configuration.NameValueSectionHandler, System, Version=4.0.0.0, Culture=neutral, PublicKeyToken=b77a5c561934e089" requirePermission="false" />
</configSections>
<ldapConfiguration>
<add key="server" value="SomeServer.Boo.Yah" />
<add key="userName" value="SomeServerUserName" />
<add key="password" value="InternalPassword" />
<add key="rootNode" value="OU=Personnel,DC=SomeServer,DC=Boo,DC=Yah" />
<add key="filter" value="(&(objectClass=person)(samaccountname={0}))" />
</ldapConfiguration>
...
<configuration>
All ldapConfiguration parameters are required.
ldapConfiguration should contain the server, userName and password parameters for an LDAP connection. Also, it should contain the rootNode and filter parameters for LDAP search. If you do not specify an option, the LDAP connection or search fails and auto provisioning does not work for the Windows Integrated Security authentication provider. As a result, Neurons for ITSM Cloud cannot create a new employee on external authentication.
The ldapConfiguration parameter is a custom configuration section, so it should be added to the configSections collection.
Configuring Windows Integrated Security Provider to Sign its Response with a Certificate
The Neurons for ITSM authentication provider may be marked with a public certificate. See Configuring Ivanti Neurons for ITSM and Windows Integrated Security. This reduces the ability of external sites to send the authentication requests to Neurons for ITSM and successfully authenticate. It also means that only requests signed with the corresponding private certificate result in a successful authentication.
You can configure the Windows Integrated Security provider with a private certificate, by doing the following:
1.Open the web.config configuration file for the Windows Integrated Security site.
2.Specify the wisCertificatePath application setting and name of the private certificate.
3.Specify the wisCertificatePassword secure application setting for the certificate password.
For example:
<configuration>
...
<configSections>
<section name="secureAppSettings" type="System.Configuration.NameValueSectionHandler, System, Version=4.0.0.0, Culture=neutral, PublicKeyToken=b77a5c561934e089" requirePermission="false" />
</configSections>
...
<appSettings>
<add key="wisCertificatePath" value="Certificate\WISCertificate.pfx" />
</appSettings>
...
<secureAppSettings>
<add key="wisCertificatePassword" value="HEATSoftware1" />
</secureAppSettings>
...
</configuration>
Specify the wisCertificatePassword parameter in the secureAppSettings custom configuration section. It contains the password for the private certificate so that it can be encrypted to reduce the possibility of a password leak.
The secureAppSettings parameter is a custom configuration section that you should addto the configSections collection in the web.config file as shown in the example above.
If the authentication provider is marked with a public certificate and the Windows Integrated Security site is not configured with a private certificate, the following occur and the external authentication fails:
•The private certificate password wisCertificatePassword is not specified in the web.config file.
•The private certificate password is incorrect.
•The private certificate name wisCertificatePath is not specified in the web.config file.
•The private certificate name is specified incorrectly.
Failed External Authentication
At same time, if the Neurons for ITSM authentication provider is not marked with a public certificate and Windows Integrated Security configured with the private certificate, then the Neurons for ITSM external authentication succeeds and the user is redirected to the default page.
Configuring the Server to use Windows Integrated Security
By default, the Windows server and the local server of the Windows operating system are not configured to use Windows Integrated Security. Therefore, you cannot use Windows Integrated Security to perform Windows authentication for Neurons for ITSM external authentication.
•Enabling Windows Integrated Security on the Microsoft IIS Web Server
•Enabling Windows Integrated Security on the Windows Server Microsoft IIS Web Server
•Enabling the Server for Windows Integrated Security
•Testing the Server Configuration
Enabling Windows Integrated Security on the Microsoft IIS Web Server
To enable Windows Integrated Security on the Microsoft IIS web server, do the following:
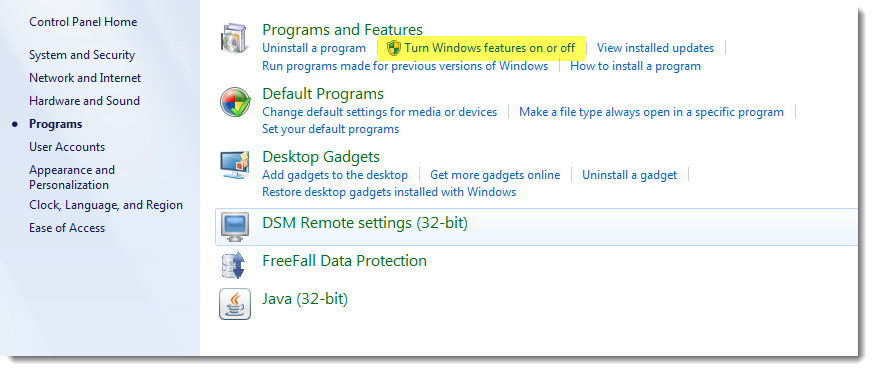
1.Within Windows, go to Control Panel > Programs > Turn Windows features on or off.
Turn Window Features On or Off
The application displays a list of features.
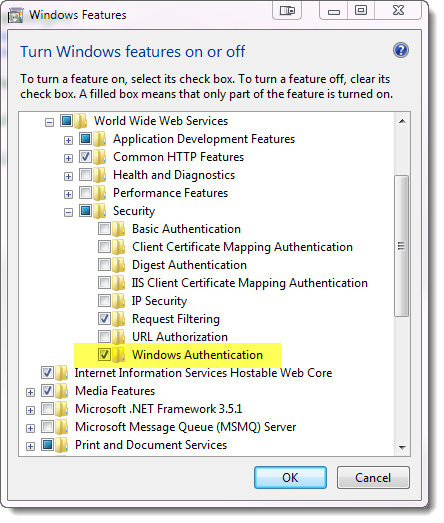
2.Expand Internet Information Services, then go to World Wide Web Services > Security, then check Windows Authentication.
Windows Integrated Security - Web
3.Click OK, then close the window.
Enabling Windows Integrated Security on the Windows Server Microsoft IIS Web Server
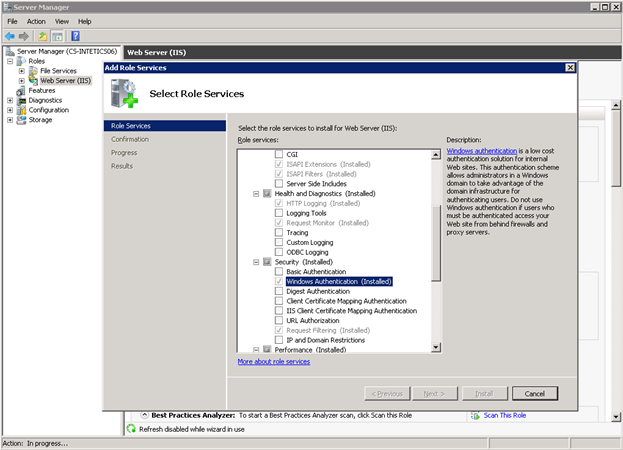
To enable Windows authentication on the Windows server Microsoft IIS web server, do the following:
1.Within Windows, right-click Computer, then choose Manage. The application opens the Server Manager.
2.Expand Roles, right-click Web Server (IIS), then choose Add Role Services. The application opens the Add Role Services window.
3.Expand Security, select Windows Authentication, then click Install.
Windows Integrated Security - Server
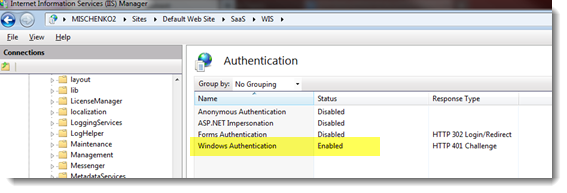
Enabling the Server for Windows Integrated Security
After Windows authentication is enabled on the server, enable it for Windows Integrated Security:
1.In the Windows search box, enter inetmgr. The application opens the IIS Manager window.
2.Go to MachineName > Sites > Default Web Site > HEAT > WIS.
3.In Features View, select Authentication.
4.Right-click Windows Authentication, then choose Enable.
5.Disable all other authentication types.
Enabling Windows Integrated Security
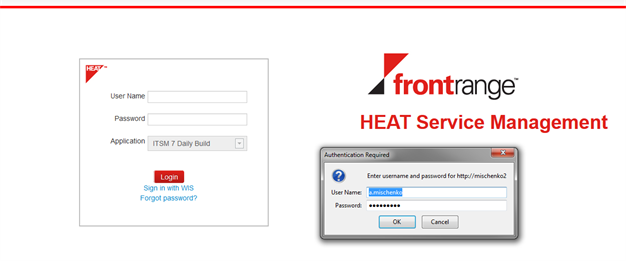
Testing the Server Configuration
To test, log into Neurons for ITSM with external authentication using the Windows Integrated Security authentication provider. If Windows Integrated Security was installed correctly, the application displays the default window.
Successful Windows Integrated Security Installation
Setting the Default Authentication Provider
Designate an authentication provider as the default to ensure that users access the correct configuration. You can only designate one provider as the default.
1.From the Configuration Console, click Configure > Security Controls > Authentication Providers to open the Authentication Providers workspace.
2.Select the provider to make the default.
3.Click Set Default from the toolbar.
Configuring Windows Integrated Security to Work in Debug Mode
•About Configuring Windows Integrated Security to Work in Debug Mode
•Enabling Debug Mode for Windows Integrated Security
•About the SAML Request Validation Error Message
•About the LDAP Configuration Error Message
•About the SAML Response Signature
About Configuring Windows Integrated Security to Work in Debug Mode
Using Windows Integrated Security in debug mode shows you all configurations used in Windows Integrated Security, and errors that occurred during validation of a SAML request or construction of a SAML response. You can easily determine the cause of failed external authentication using this method.
Windows Integrated Security in debug mode shows the following information:
•Request validation information
•SAML request in XML format
•LDAP server information
•Auto provisioning block, LDAP search result parameters and attributes
•SAML response certificate
•SAML response in XML format
Enabling Debug Mode for Windows Integrated Security
To enable debug mode for Windows Integrated Security authentication provider, do the following:
1.From the Configuration Console, click Configure > Security Controls > Authentication Providers to open the Authentication Providers workspace.
2.Open the Windows Integrated Security authentication provider record. See Working with ADFS/SAML.
3.Add a debug parameter to the identity server URL. For example, the URL might be /HEAT/WIS/Default.aspx?debug=true.
4.Click Save.
5.Log out.
6.Log in using Windows Integrated Security authentication provider, using the Windows user name and password. The application displays the Windows Integrated Security debug mode page.
Windows Integrated Security Debug Mode Page
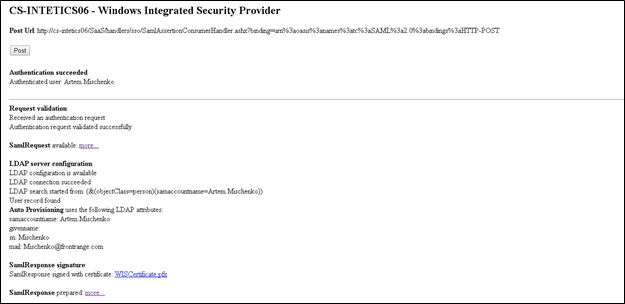
The following links appear on this page:
•More ...: Hides and shows the SAML request or SAML response.
•Private certificate: Used for the signature of the SAML response. This downloads the corresponding public certificate.
•Post: Posts the SAML response to Neurons for ITSM to the corresponding AssertionConsumerHandler.
About the SAML Request Validation Error Message
If the authentication request validation fails, the application disables the Post button and you cannot perform external authentication with the Windows Integrated Security provider. An error message appears.
SAML - Authentication Request Error Message

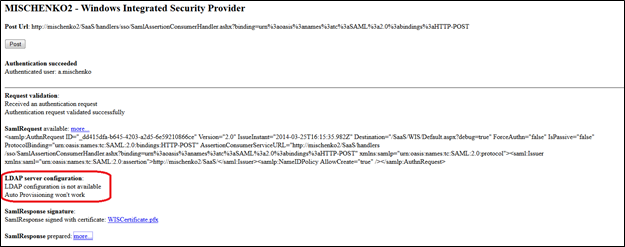
About the LDAP Configuration Error Message
If you do not specify the ldapConfiguration parameter in the web.config file, auto provisioning does not work for the Windows Integrated Security provider and the application displays an error message in the debug log. For detailed information, see Configuring Windows Integrated Security for Auto Provisioning. Users can still log in externally without auto provisioning and post SAML responses to Neurons for ITSM.
LDAP - Authentication Request Error Message
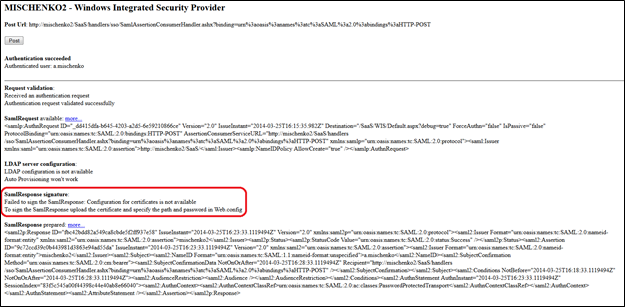
About the SAML Response Signature
If you configure Windows Integrated Security in the web.config file to sign the SAML response with the private certificate and you specify the wrong certificate password, the application displays an error message in the debug log. The application still creates a SAML response, but it does not have a signature. Posting this SAML response back to Neurons for ITSM fails.
SAML Response - Failed Authentication
About Disabling Windows Integrated Security
If you do not configure Microsoft IIS to perform Windows Integrated Security or if you do not enable Windows authentication for Windows Integrated Security, external authentication with the Windows Integrated Security provider fails.
Windows Integrated Security Fails

About the Encrypted Config Sections in the Web.config File
The web.config file of the Windows Integrated Security application may contain passwords for the following:
•LDAP server configuration
•Private certificate password
To reduce the possibility of a password leak at the servers where Windows Integrated Securityis deployed, some config sections in Web.config may be encrypted.
For detailed information, see http://msdn.microsoft.com/en-us/library/zhhddkxy(v=vs.100).aspx.
EncryptWebConfig.bat uses RsaProtectedConfigurationProvider for encryption. So once the web.config section is encrypted at one computer or server, it cannot be used in another server. The Windows Integrated Security application throws an unhandled exception in this case.
Configuring Your Browser to Use Windows Integrated Security
Windows Integrated Security works differently depending on the browser that you use. Mozilla Firefox asks you to log in each time that you access the site, while Microsoft Internet Explorer and Google Chrome browsers only ask you to log in the first time.
Microsoft Internet Explorer
Do one of the following:
•If the Windows Integrated Security site is not located on a local Microsoft IIS web server, you must add it to the list of trusted sites. Go to Tools > Internet Options > Security > Trusted sites > Sites and add the site.
•If the Windows Integrated Security site is located on a local Microsoft IIS web server, you do not need to make changes in the security options, since local intranet sites use the Automatic logon in Intranet zone option by default.
Google Chrome
Google Chrome takes its trusted site settings from the same internet options as Microsoft Internet Explorer.
1.Open Google Chrome.
2.Go to Settings > Show advanced settings > Change proxy settings > Security > Trusted Sites > Sites.
3.Click Show advanced settings....
4.Click Change proxy settings.... The application displays the Internet Properties dialog box.
5.Click the Security tab.
6.Click Trusted sites.
7.Click Sites.
8.Add the site.
9.Click Close and then click Apply. The application now asks you to log in the first time that you access the trusted site.
Mozilla Firefox
There are two methods that you can use.
Configuration Method
Mozilla Firefox provides a configuration string that you can modify to enable this functionality.
1.Open a new tab in Firefox.
2.In the address bar, enter about:config. Firefox displays a message that this is not recommended.
3.Click I'll be careful, I promise!. The configuration page loads.
4.In the search box, enter network.automatic.
5.Double-click the row that contains network.automatic-ntlm-auth.trusted-uris. The application opens the Enter string value dialog box.
6.Enter http://your_intranet_server_name or http://www.your_site.com.
•You can add multiple sites separated by commas, such as http://your_intranet_server_name, http://www.your_site.com.
•To specify all subdomains, enter .your_site.com instead of www.your_site.com.
7.Click OK.
Extension Method
You can use the Mozilla Firefox extension instead of configuring the about:config file when you need to work with a site with NT Lan Manager (NTLM) authentication. This extension is called integrated authentication for Firefox.
Install the extension by doing the following:
1.In Firefox, search for Integrated Authentication for Firefox. The application displays the results and the first one should be the extension.
2.Click Add to Firefox.
3.Click Install.
4.Restart Firefox.
The application displays a new option that lets you add or remove entries. As with the configuration method, only enter the http:// prefix and host name of the server. There is no trailing slash nor a path to any particular page. The application enables authentication on a per-site basis.